
Both Odoo Community and Enterprise require external email servers in order to send and receive messages. Odoo is flexible, and allows you to use popular email providers like Gmail, Yahoo or Outlook for this purpose. However, you can also install a simple email server on your Ubuntu machine and configure Odoo to send and receive emails through it.
Installing a mail server is not an easy task because there are several components that have to be configured. In this tutorial, we will describe the easy way of doing this, using an open-source mail server solution that can be deployed in a few minutes.
Prerequisites
Before installing the email server, you must set a fully qualified domain name (FQDN) on your machine. This is easily done by executing the command:
hostnamectl set-hostname new_hostname
You can run the command hostname to make sure the FQDN was properly configured. The hostname doesn’t have to be a real domain, in this example we used demo.odoo.com:
![]()
The other prerequisite is to have an actual domain with the MX DNS records pointing to the IP of your server.
Download iRedMail
iRedMail is a free suite that allows you to install a fully functional mail server just by executing a script.
It uses bzip for compression, so make sure the package is installed, you will also need wget to download it:
apt-get install bzip2 wget
Move to the home directory of the root user, then download and unpack the installation script
|
1 2 |
cd wget https://bitbucket.org/zhb/iredmail/downloads/iRedMail-0.9.8.tar.bz2 tar xjf iRedMail-0.9.8.tar.bz2 |
The latest version of iRedMail at the moment is 0.9.8 but new versions will be available in the future. Visit the official download page and get the current stable release, you’ll have to modify the commands with the new version number.
Install iRedMail
It is time to run the script that installs all iRedMail components:
|
1 2 |
cd iRedMail-0.9.8 bash iRedMail.sh |
The installer displays a welcome screen and then you’ll have to answer a few questions, we’ll guide you through the options.
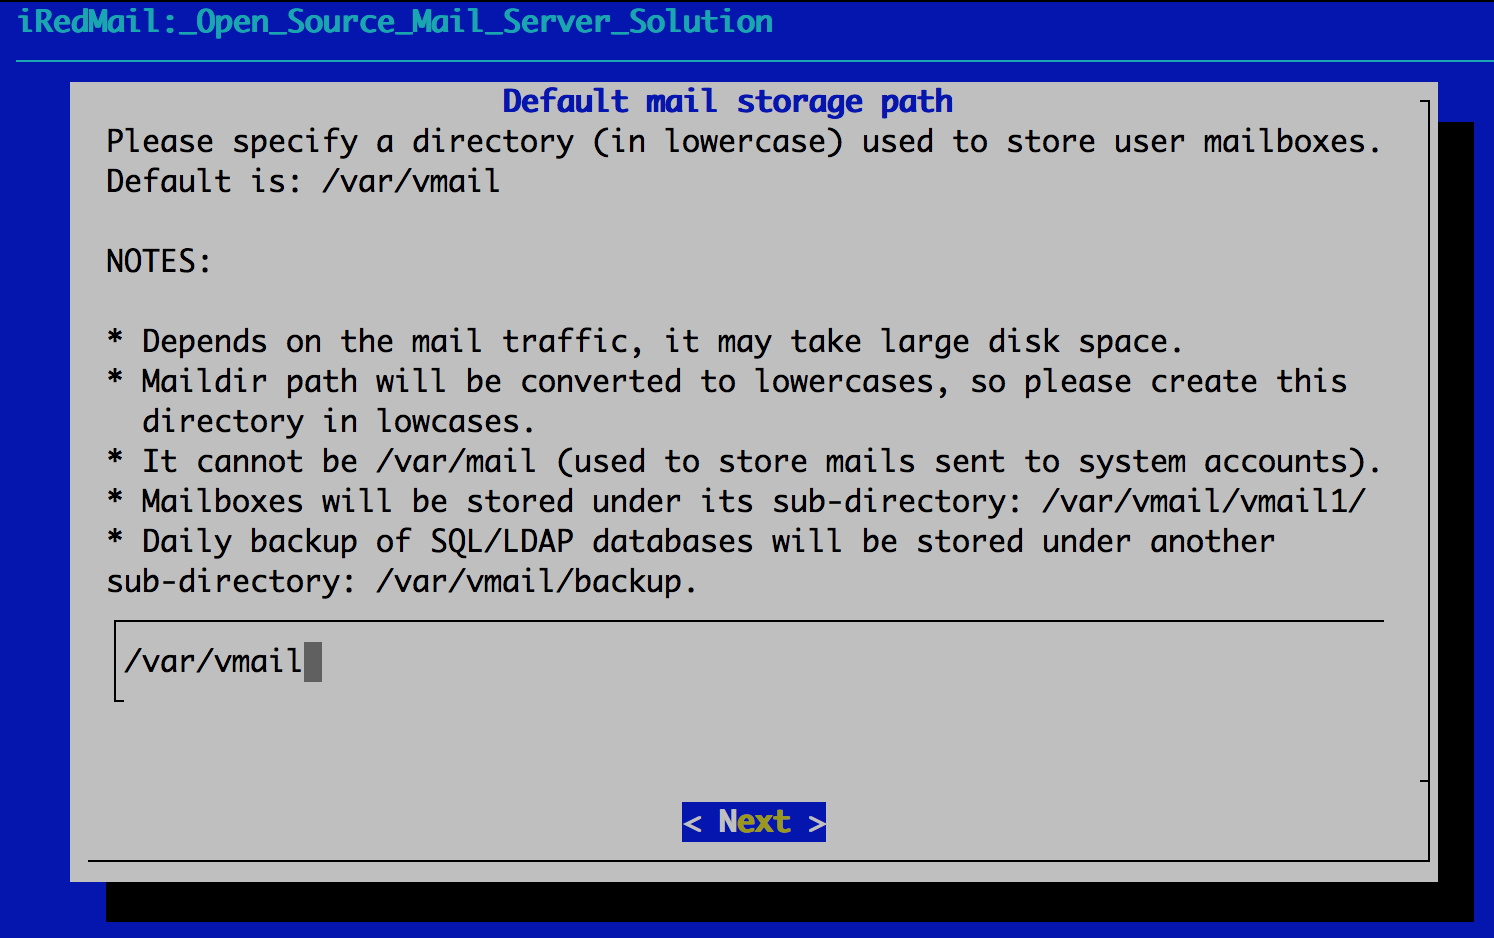
The default mailbox storage location is /var/vmail/, you can select a different one or place it on a separate partition if you want to prevent it from taking too much space:
In the next screen, you can disable the web server (iRedMail uses Nginx) if you don’t plan to use the web features.
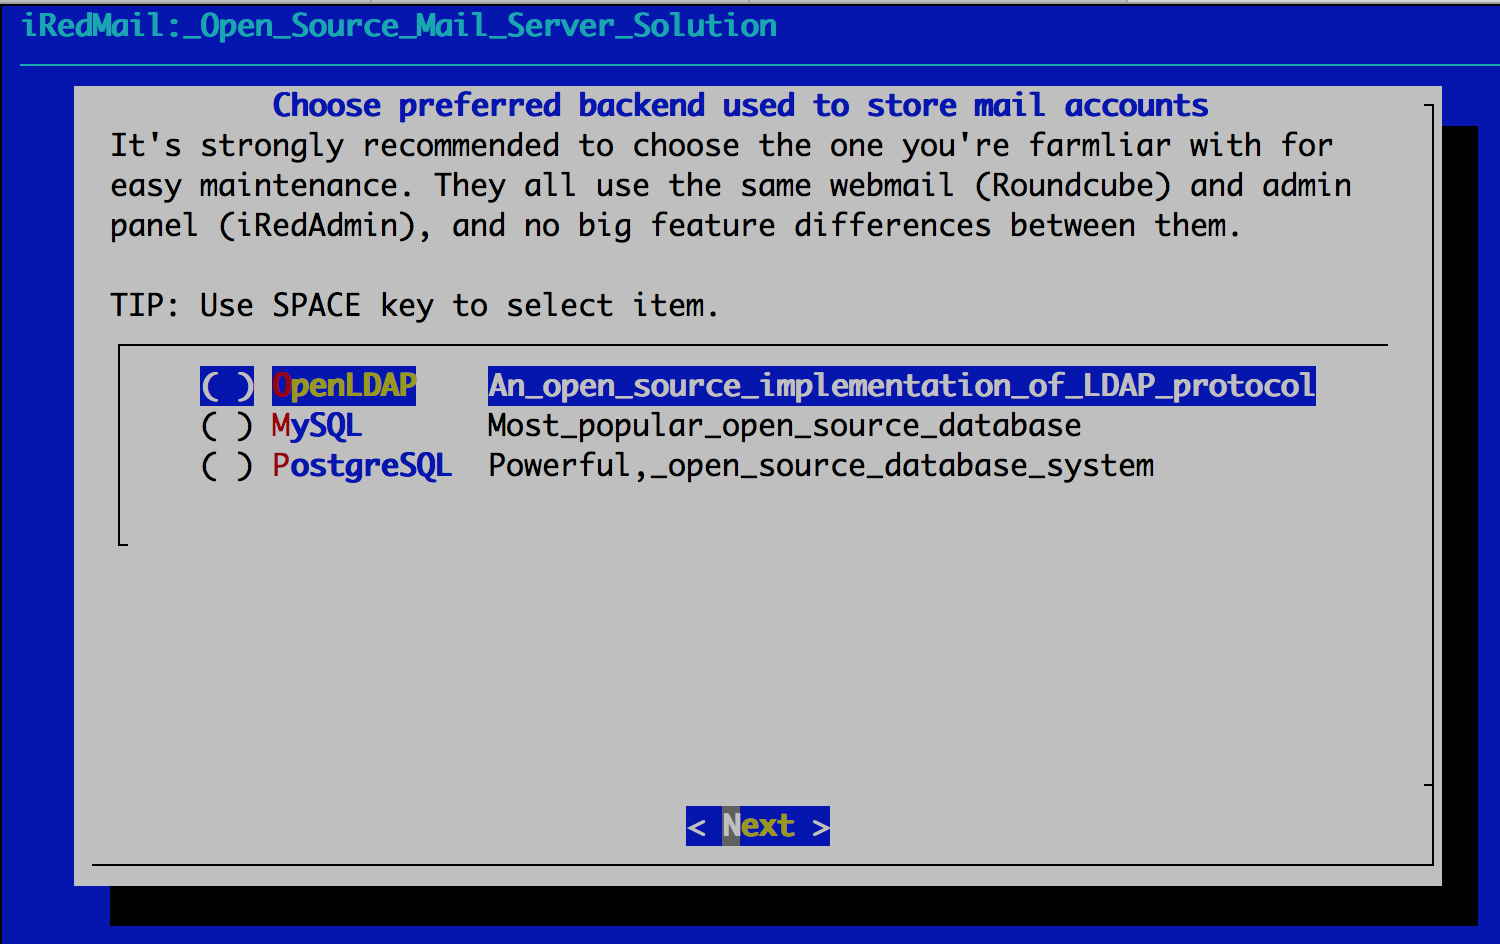
The backend gives you a choice between OpenLDAP, MySQL, MariaDB and PostgreSQL, you should choose MySQL since it’s the easiest to configure.
You will then be asked to enter and confirm a root user password for the MySQL server.
In the next screen, add your initial mail domain and choose a password for the admin user and email account:
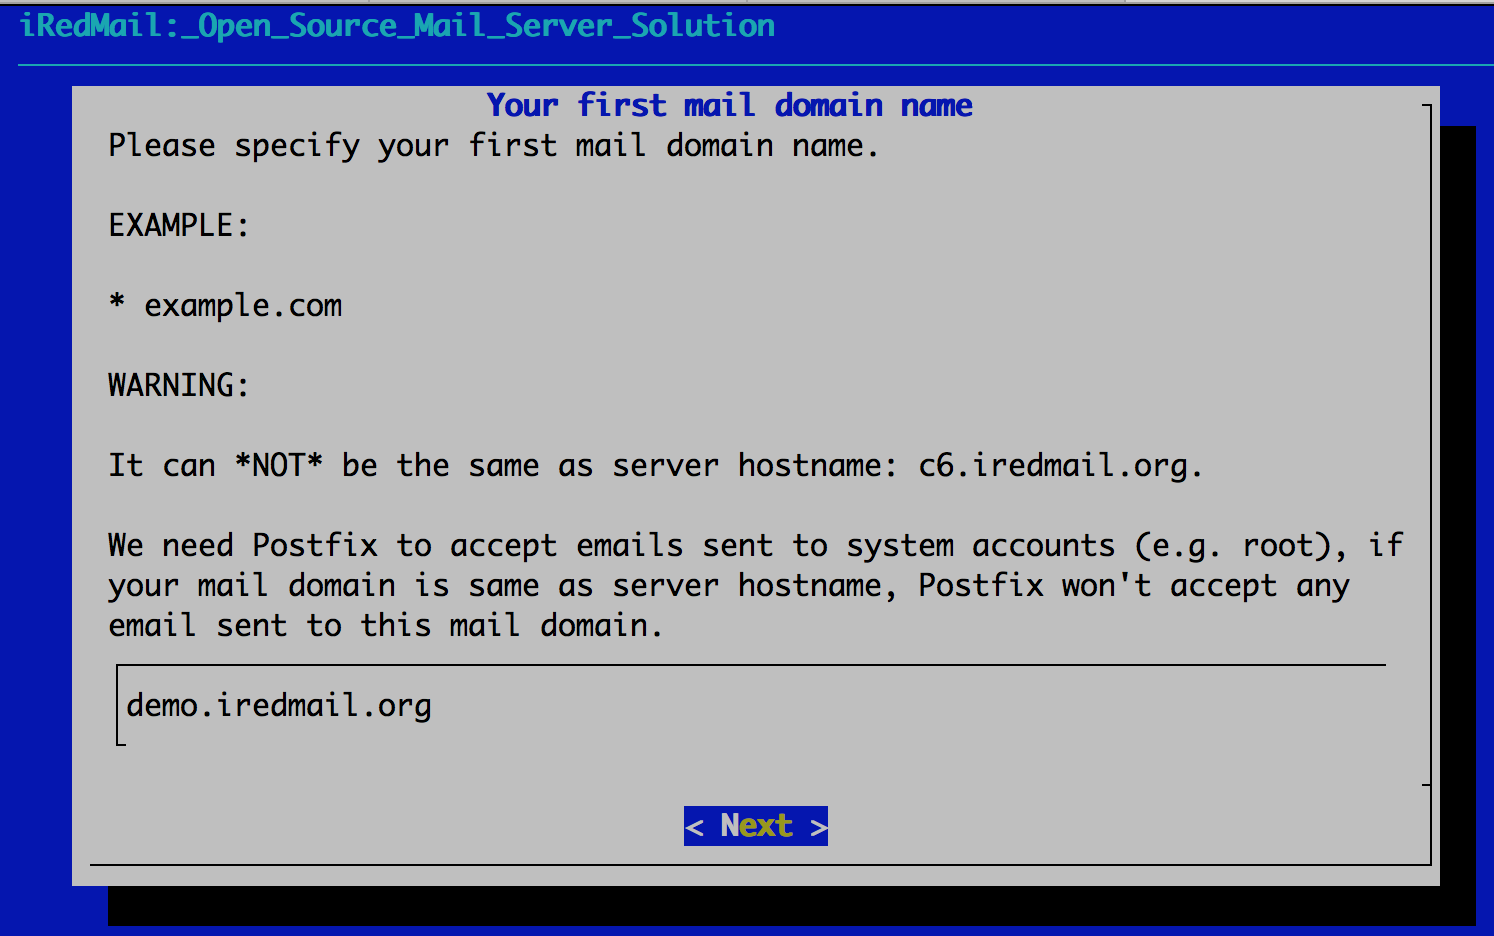
This account will be used to login to the iRedMail administration panel, so make sure you note down the credentials.
The final step is to select the additional components that will be installed:

These include the admin panel iRedAdmin, Roundcube webmail client, an alternative webmail option (SOGo), the very useful monitoring tool Netdata and Fail2Ban, a module that protects your mail server against brute force attacks.
The script will ask for a final confirmation, and then starts to install and configure your packages.
It will run for a few minutes, the only question you’ll have to answer at the end is if to apply the iRedMail default firewall rules for port 22.
![]()
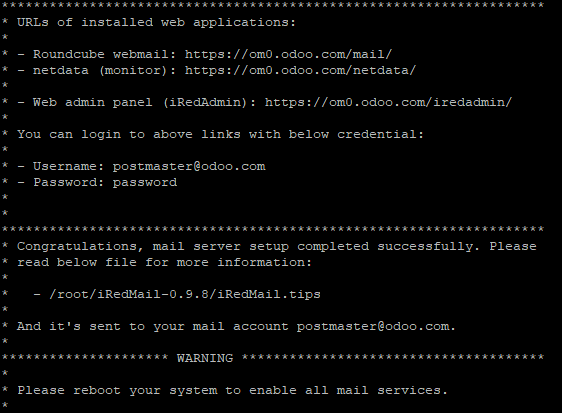
Installation is now complete; the script will display some useful information and notify you that a reboot is needed. The file /root/iRedMail-0.9.8/iRedMail.tips contains access credentials and configuration settings for all of the installed components.
Create an email address
All services are active after the reboot, so you can use the admin panel to create mailboxes or add more domains. You can access it at https://<server_IP_or_domain>/iredadmin/
The Domains and Accounts tab shows all your active domains. Click on the Add button and select User to create a new email address.
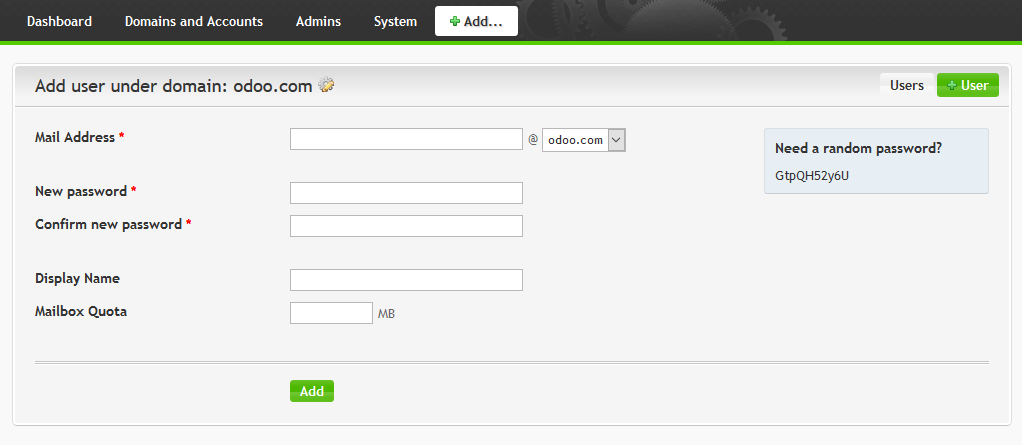
After creating a user, you can use the Roundcube webmail at https://<server_IP_or_domain>/mail/ to send and receive messages.
Configure Odoo to use your mail server
Log in to Odoo as a system administrator and go to Settings – General Settings, then check the External Email Servers box. Enter the domain name of your email server in the Alias Domain field:
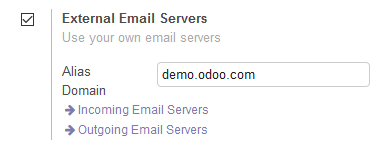
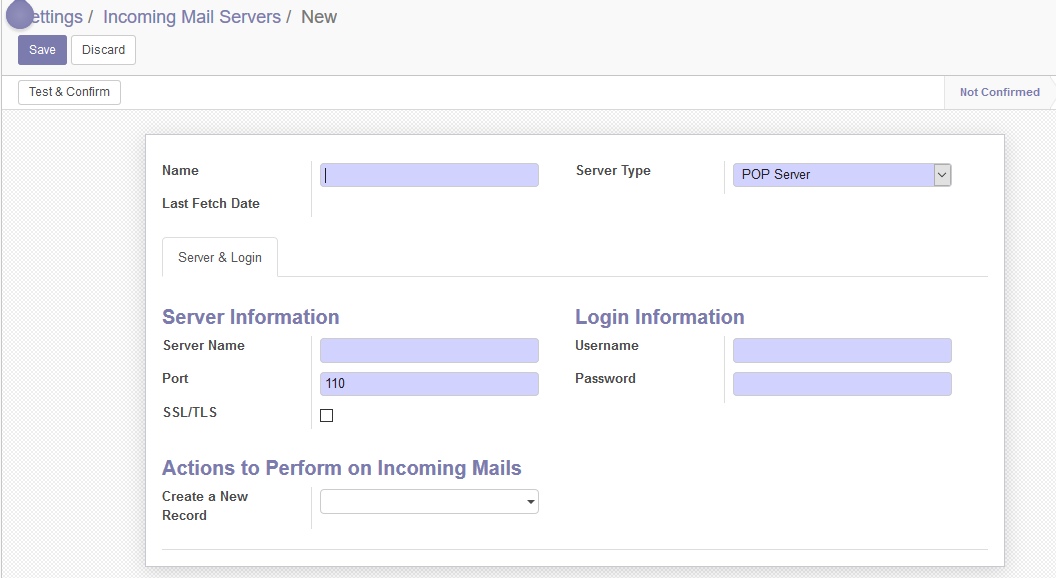
There are two screens that must be configured here: Incoming Mail Servers and Outgoing Mail Servers.
Click each one of them and then the Create button.
Enter the connection data and your admin credentials, save your settings at the end. There is also an option to test the connection.
That was it; Odoo will now use your own email server for messaging.
Configuring and securing an email server in Linux can be quite difficult. This tutorial provides an easy solution to create an open-source and full-featured server for your Odoo platform.