
MySQL is the most popular database server in the world and every cPanel installation includes it by default. It is used by all common modern applications like WordPress or Magento, as well as by cPanel itself.
Some of the most important security features are already activated in the MySQL instance that comes installed with cPanel, but let’s see how you can secure it even further.
Run the provided security script
After a fresh installation of MySQL, system administrators usually run the mysql_secure_installation command in order to improve the basic security of the application.
Since the database server is already installed in cPanel, running this command is not an option. However, cPanel provides its own script that allows you to tweak the key security options.
Log in to your server using SSH and run this command with root privileges to see the available options:
/scripts/securemysql –h
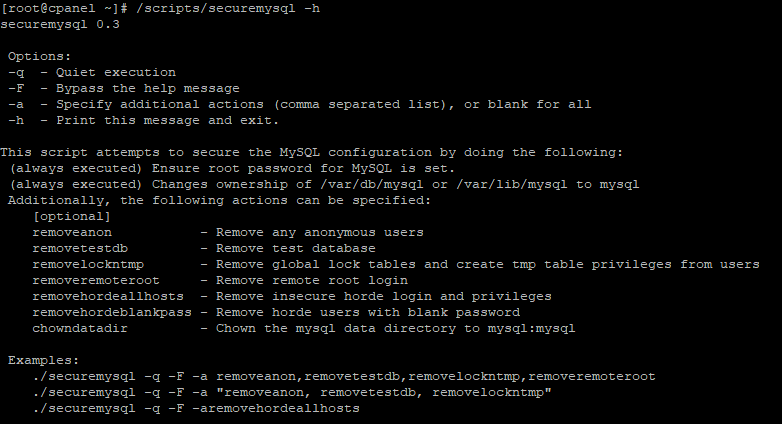
The script checks by default if the root database password is set and that the home folder of MySQL /var/lib/mysql is owned by the mysql user. This prevents any compromised system accounts or scripts from reading your database contents.
The command options allow you to perform other important tasks, such as removing the test database or the anonymous users.
Adjust the command based on your particular needs, executing it with the –a flag will include all of the optional actions.
Running the script will patch the most critical security vulnerabilities of your server. An example syntax with two common options is:
/scripts/securemysql -q -F -a removeanon,removetestdb
Hide the root password
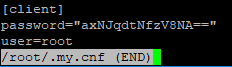
When cPanel installs the MySQL server, a random root database password is generated by default.
This password is stored in the /root/my.cnf file and allows you to connect to the database server from the command line without a password prompt.
However, this practice can be insecure, since it potentially grants intruders full database privileges. It is a good idea to remove it, so open the file with your favorite command line text editor.
Note down the root password so you won’t be locked out of your server, and then remove the entries.
Use strong passwords
The default password is very strong but you can generate an even more complex one if you want. You should also change the root database password if you suspect it might have been compromised.
You can easily reset the password from WHM, go to Home -> SQL Services -> MySQL Root Password
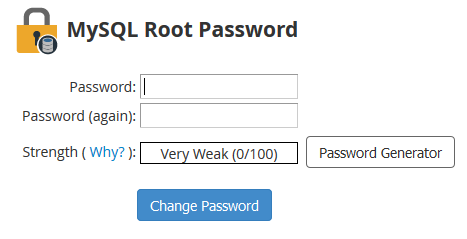
The tool conveniently includes a password generator, from the Advanced Options menu you can make it even longer and more difficult to crack.
Make sure that you note the new password in a safe place, just in case you’ll ever need it to connect from the command line.
From the Home -> Security Center -> Password Strength Configuration menu, you can also enforce a strict password policy to all users on the server.
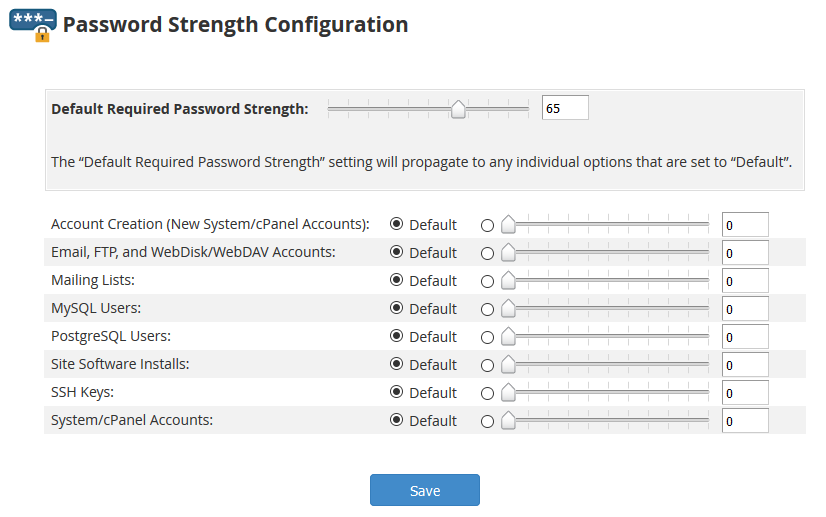
There are two separate values that you can set: a Default Required Password Strength for all types of accounts or a specific one for MySQL users. The default value is 65, set it to 100 in order to force users to generate passwords that resist brute force attacks.
Install a firewall
Installing and configuring a firewall will greatly improve the security of your server in general. The best option is CSF (Config Server Firewall) because it is robust, easy to use and includes a free WHM plugin.
We have already described the installation of CSF in a previous article.
Block the MySQL network port (3306) globally from the firewall; you can later enable it for specific IP addresses if needed.
Tweak more settings
Even if you are an experienced user, it is always a good idea to back up the entire /var/lib/mysql folder before changing any settings. You can backup this folder or an entire account from Home -> Backup -> Backup Configuration.
If you don’t connect remotely to the MySQL server, it is a good practice to disable networking completely, even if the port is already blocked in the firewall.
This can be done by editing the /etc/my.cnf file from the command line; you just have to add the line skip-networking in the [mysqld] block. Restart the MySQL service in order to apply the change. The server will no longer listen for external connections and will only accept local clients.
Another good idea is to disable the history file, which is located in your home folder. All executed commands are stored in this file, including passwords in clear text.
In order to disable it, you can run the following command:
ln -sf/dev/null ~/.mysql_history
Your database contains critical information about you and your clients, so it is very important to make it as secure as possible. Applying the settings described in this article is will harden your MySQL installation against malicious actors.