No server is safe against the numerous vulnerabilities and attack vectors that exist today. cPanel offers many safety features but not all of them are activated or properly configured by default. Here are five basic ways to make your server more secure and protect it from the most common types of attacks.
1. Secure your passwords
Insecure password are the most common security vulnerability of most servers. Weak passwords can be easily breached by brute force attacks and hackers can also sometimes gain access to passwords stored in insecure locations.
If your password is not strong enough or it might have been compromised, change it as soon as possible. The root password can be modified from WHM -> Server Configuration -> Change Root Password, use the included tool to generate a random one.
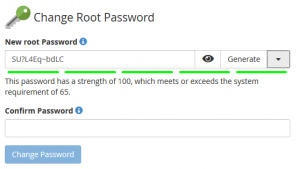
The password of each cPanel account can be changed from WHM -> Account Information -> List Accounts, always use a generated password that guarantees proper strength.
![]()
In order to secure your server even further, you can enable two-factor authentication, a login method that requires both the password and a security code generated by a smartphone app. It is disabled by default, in order to enable it go to WHM -> Security Center -> Two-Factor Authentication. You will then have to configure it for every user; cPanel supports several popular phone apps such as Google Authenticator. Install the application and then scan the QR code provided in WHM in order to configure it and generate a security code.
2. Secure SSH connections
SSH uses port 22 by default, which is constantly targeted by brute force attacks. Changing this port will significantly reduce the number of intrusion attempts.
From the command line, use your favorite text editor to edit the file /etc/ssh/sshd_config and enter a different number in the line Port 22 (the line might be commented out). While cPanel recommends using a port number less than 1024, this can cause conflicts with other services, so our advice is to set up a port number greater than 10000. You will have to restart the SSH service in order for the change to take effect.
If you have an active firewall on your server, make sure you open the new port before changing it; otherwise you might be locked out.
You can also disable password authentication completely and use a pair of keys to connect to your server through SSH.
3. Update cPanel and other packages
cPanel constantly releases new versions that patch security flaws and provide bug fixes, so it is very important to always be up to date.
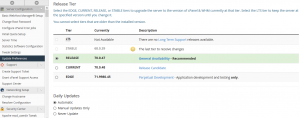
By default, Cpanel automatically checks for updates and installs them every day, this includes operating system packages. You can modify these settings and select a different release tier from the menu at WHM -> Server Configuration -> Update Preferences. A manual update can be performed at any time from WHM -> cPanel -> Upgrade to Latest Version, while system packages can be updated from the GUI by accessing WHM -> Software -> System Update. Some of these updates require a system restart, WHM notifies you in the upper right corner of the screen when new versions are available or a reboot is needed.
Please note that updating all packages is not always a good idea on production systems; always make sure that your services and applications are compatible with the new software.
4. Activate cPHulk
cPHulk is a very useful tool provided by cPanel as protection from brute force attacks against multiple web services. It is a simple and effective system that tracks login attempts for your accounts and can block specific IP addresses and lock user accounts after a number of failures.
In order to enable cPHulk, navigate to WHM -> Security Center -> cPHulk Brute Force Protection and move the toggle to ON. You can tweak various settings such as the maximum number of failures allowed until an account is blocked. It is very important to add your own IP addresses to the whitelist, in order to avoid being locked out if you don’t type your password correctly.
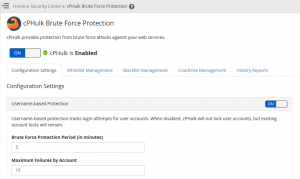
cPHulk doesn’t monitor all services on the server but it covers the most important ones: SSH logins, WHM and cPanel services (ports 2083 and 2087), as well as mail and FTP authentication.
The new version 70 of WHM also allows the management of entire countries, so you can blacklist or whitelist a large number of IPs based on their location.
5. Install a firewall
Cpanel doesn’t include a dedicated firewall but it is very easy to configure one in order to secure your server. All Linux operating systems from the Red Hat family come with the firewalld daemon and cPanel recommends using it. However, this is a command-line only utility that can be inconvenient to use.
A better option is ConfigServer Security & Firewall (commonly abbreviated as CSF), a robust firewall system that offers a free WHM plugin that allows you to control it from the GUI.
Installation requires you to run the following commands as root from the command line:
cd /usr/src
rm -fv csf.tgz
wget https://download.configserver.com/csf.tgz
tar -xzf csf.tgz
cd csf && ./install.sh
After running the script, you can configure CSF from the graphical interface at WHM -> Plugins -> ConfigServer & Firewall.
More information about firewall settings and alternatives can be found in the official article.
These five steps won’t make your server fully secure but they provide protection against most common hacking methods. Your cPanel VPS now has a solid security structure in place and the risk of getting hacked has been significantly reduced.